Azure
Azure Web Apps with RapID
In order to use Azure Web Apps with RapID, you will need to configure 2 web servers.
This is due to the limitation of Azure Web Apps not allowing the configuration of 1way/2 way TLS per channel.
- web server will be one way TLS (Your Registration web service)
- web server will be two way TLS (Your Authentication web service)
Details on how to configure one way and two way TLS for Azure Web Apps are below.
Setting up one way TLS with a Trusted Certificate on Azure Web Apps
By default, Azure Web Apps already enables HTTPS for your app with a wildcard certificate for the *.azurewebsites.net domain. If you don't plan to configure a custom domain, then you can use the default HTTPS certificate.
All wildcard domains are not as secure as using a custom domain with your own certificate.
Enabling HTTPS for a custom domain is only available for the Standard and Premium pricing tiers in Azure App Service.
To enable HTTPS for custom domains you will need to do the following.
Get a TLS certificate
Commercial Certificate Authority TLS certificates allow web servers to encrypt their traffic, and also offer a mechanism to validate server identities to their visitors.
There are various Certificate Authority companies where you can request and obtain a trusted TLS certificate for use on your web server.
The certificate must meet the following requirements for TLS certificates in Azure:
- The certificate must contain a private key.
- The certificate must be created for key exchange, exportable to a Personal Information Exchange (.pfx) file.
- The certificate's subject name must match the domain used to access the app. If you need to serve multiple domains with this certificate, you will need to use a wildcard value or specify subjectAltName values as discussed previously.
- The certificate should use a minimum of 2048-bit encryption.
- Certificates issued from private CA servers are not supported by Azure App Service. To get an SSL certificate for use with Azure App Service, you submit a Certificate Signing Request (CSR) to a Certificate Authority and then generate a .pfx file from the certificate you receive back. You can do this using the tool of your choice. (e.g. IIS Manager, OpenSSL)
Note: If your CA of choice uses intermediate certificates each of them must be installed along with the certificate issued for your domain. Failing to install any of the intermediate certificates may cause hard to reproduce interoperability problems for some clients.
Configure TLS in your Azure Web App
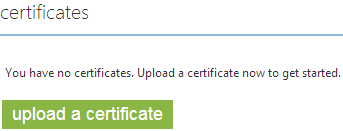
On the Azure Configure screen, go to certificates:

In the certificates section, click Upload

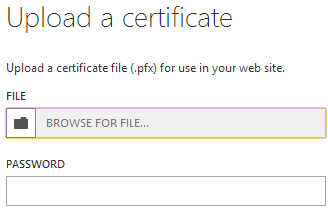
Use the Upload a certificate dialog box to select the .pfx certificate file created earlier using the IIS Manager or OpenSSL. Specify the password that was used to secure the .pfx file. Finally, click the Save to upload the certificate.
In the ssl bindings section of the SSL Settings tab, use the dropdowns to select the domain name to secure with SSL, and the certificate to use. You may also select whether to use Server Name Indication (SNI) or IP based SSL.

- IP based SSL associates a certificate with a domain name by mapping the dedicated public IP address of the server to the domain name. This requires each domain name (intercede.com, rapidauth.com, etc.) associated with your service to have a dedicated IP address. This is the traditional method of associating SSL certificates with a web server.
- SNI based SSL is an extension to SSL and Transport Layer Security (TLS) that allows multiple domains to share the same IP address, with separate security certificates for each domain. Most modern browsers (including Internet Explorer, Chrome, Firefox and Opera) support SNI, however older browsers may not support SNI.
Click Save to save the changes and enable SSL.
At this point, you should be able to visit your app using HTTPS:// instead of HTTP:// to verify that the certificate has been configured correctly.
Enforce SSL on your app
Azure App Service does not enforce HTTPS by default. Visitors may still access your app using HTTP. If you want to enforce HTTPS for your app, you can use the URL Rewrite module. The URL Rewrite module is included with Azure App Service, and enables you to define rules that are applied to incoming requests before the requests are handed to your application.
It can be used for applications written in any programming language supported by Azure.
Note: .NET MVC applications should use the RequireHttps filter instead of URL Rewrite.
URL Rewrite rules are defined in a web.config file stored in the root of your application. The following example contains a basic URL Rewrite rule that forces all incoming traffic to use HTTPS.
URL Rewrite Example Web.Config
<?xml version="1.0" encoding="UTF-8"?>
<configuration>
  <system.webServer>
    <rewrite>
      <rules>
        <rule name="Force HTTPS" enabled="true">
          <match url="(.*)" ignoreCase="false" />
          <conditions>
            <add input="{HTTPS}" pattern="off" />
          </conditions>
          <action type="Redirect" url="https://{HTTP_HOST}/{R:1}" appendQueryString="true" redirectType="Permanent" />
        </rule>
      </rules>
    </rewrite>
  </system.webServer>
</configuration>
This rule works by returning an HTTP status code of 301 (permanent redirect) when the user requests a page using HTTP. For example, HTTP://rapidauth.com would be redirected to HTTPS://rapidauth.com.
Setting up two way TLS on Azure Web Apps
Once you have configured one way TLS with a Trusted Certificate you can now configure two way TLS mutual authentication.
To setup your web app to require client certificates you need to add the clientCertEnabled site setting for your web app and set it to true.
This setting is not currently available through the management experience in the Portal, and the REST API will need to be used to accomplish this.
You can use the ARMClient tool to make it easy to craft the REST API call. After you log in with the tool you will need to issue the following command:
ARMClient PUT subscriptions/{Subscription Id}/resourcegroups/{Resource Group Name}/providers/Microsoft.Web/sites/{Website Name}?api-version=2015-04-01 @enableclientcert.json -verbose
replacing everything in {} with information for your web app and creating a file called enableclientcert.json with the following JSON content:
{
  "location": "My Web App Location",
  "properties": {
    "clientCertEnabled": true
  }
}
Make sure to change the value of "location" to wherever your web app is located e.g. North Central US or West US etc.
Accessing the Client Certificate from Your Web App
If you are using ASP.NET and configure your app to use client certificate authentication,
the certificate will be available through the HttpRequest.ClientCertificate property.
For other application stacks, the client cert will be available in your app through a base64 encoded value in the "X-ARR-ClientCert" request header.
Your application can create a certificate from this value and then use it for authentication and authorization purposes in your application.
Certificate Validation
The client certificate that is sent to the application does not go through any validation by the Azure Web Apps platform. Validating this certificate is the responsibility of the web app. Code will need to be included that validates certificate properties for authentication purposes against the trusted issuer certificate file (available from your RapID Customer Dashboard).
For sample code related to this, see the client certificate validation section of RapID QR code authentication.